
FL Studio Plugin Management (Part 2): Organizing Your Plugin Library Efficiently

Table of Contents
Introduction
In Part 1 of this blog series, we laid the groundwork for understanding how plugins work inside FL Studio, from plugin types and formats to scanning and database management. In Part 2, we’re taking things a step further. This is where producers can take control of their growing plugin collections and build a more streamlined, efficient workflow.
If you’ve ever found yourself endlessly scrolling through long plugin lists, second-guessing which version to load, or forgetting where that perfect synth is hiding, you’re not alone. As your collection grows, so does the clutter. But with some smart organization up front, you can cut through that friction. The time you invest here pays itself back quickly: less browsing, more creating.
Initial Tip: Adjusting Your Plugin Dropdown View settings
Before we dive in too deep, let’s cover one critical dropdown view setting that will make your plugin navigation much easier.

Add Plugin dropdown view options:
Simple — All plugins are shown alphabetically in one long list.
Categories — All plugins are shown at once, but grouped by folder.
Tree — Only one folder level is shown at a time, giving you a focused view you can drill into as needed.
I personally use and heavily recommend the Tree view. With hundreds of plugins installed, the other options feel overwhelming and cluttered. Everything I demonstrate in this blog will use the Tree format, so if you want to follow along one-to-one, I suggest switching to it now.
Understanding The Plugin Database
Let’s walk through the basics of the main browser location and files that we will be working with for our plugins, the Plugin Database.
In Part 1 of this series, we covered FL Studio’s Plugin Manager, the tool used to scan and verify your installed plugins. For this guide, I’ll assume you’ve already scanned in your plugins. If not, feel free to revisit Part 1 before continuing.
Once scanned, your plugins appear in the Plugin Database under Installed. From there, as you begin flagging them as favorites, they’ll be added to your Effects and Generators plugin dropdowns.
Accessing the Plugin Database
The Plugin Database is part of FL Studio’s Browser and serves as the foundation for managing your installed and favorited plugins. You can quickly access it by pressing Shift + F8 on your keyboard, or by opening the Browser and clicking the plug-shaped tab.
Inside the Plugin Database, you’ll find three key folders:
Effects — Favorited (starred) effects Plugins. These show up in your Plugin Picker (
F8) and the Add Plugin dropdowns in the Mixer.Generators — Favorited (starred) instrument plugins. These appear in the Plugin Picker and the Add Plugin dropdowns in the Channel Rack and Playlist.
Installed — Lists all scanned plugins, separated into Effects and Generators, whether favorited or not.

This is how the Plugin Database appears in FL Studio’s Browser.
You can right-click any of these folders and select Open to jump directly to that folder in Windows File Explorer or macOS Finder.
Let’s now take a closer look at what happens when you open one of these folders. Below is a screen recording using my Effects folder as the example.
As you’ll see, the subfolders inside the Effects folder align exactly with the folder structure shown in FL Studio’s Browser and they also mirror what appears in your plugin dropdown menus (especially helpful in Tree View).
When you edit these folders directly in Explorer or Finder (renaming, adding, or moving items); your changes will reflect in FL Studio after refreshing the Browser using the curved arrow icon (↺) at the top of the Browser panel.
Next, we’ll break down what lives inside these folders so you know exactly what you’re organizing and why it matters.
The Plugin Preset File Types (.fst, .nfo, .png)
So what exactly lives inside these Plugin Database subfolders? This section breaks down the key file types and how they correspond to what you see in your Plugin Picker and plugin dropdown menus.
.fst — An FL Studio State File. This is the core preset file for either an Effect or Generator plugin. It’s the required file for a plugin to appear in your Plugin Picker or dropdowns. It also stores the exact plugin state at the time you favorited it, meaning it can serve as a snapshot of your preferred settings, not just the default INIT preset (more on this in a later section).
.nfo — An information file that maps the .fst preset to a .png image file. You can right-click and edit this file to manually assign custom images if needed.
.png — A screenshot image of the plugin UI. This is what FL Studio displays in the Plugin Picker. If no .png is found, the Picker will simply show the plugin name as plain text (from the .fst file).
When you favorite a plugin from the Plugin Manager, it typically creates only the .fst file. The .nfo and .png files are generated when you flag a plugin as a favorite manually (covered next in the Flag as Favorite section).
As shown above, all three files work together to create the visual representation in your Plugin Picker. Without the .nfo and .png, your plugin will appear only as text. In summary, for every .fst plugin in your Plugin Database, FL Studio checks for an .nfo file of the same filename. If it finds one, it reads the .png path inside to display the preview image.
While managing these visuals is optional, customizing your Plugin Picker can make browsing feel cleaner, faster, and more personalized.
Adding To Your Plugin Database
So how do you get your favorite plugins into the right folders so they appear in your dropdowns? There are a few ways to add plugins to your Effects and Generators folders in the Plugin Database. I’ll break them down here.
1. Favoriting Plugins in the Plugin Manager
The most common method is through the Plugin Manager while scanning plugins.
As you scan, new plugins are highlighted yellow.
If you had “Verify plugins” checked, FL Studio will automatically tag each as either an Effect or a Generator (labeled as Synth in the Plugin Manager).
Switch from the Options tab to the Plugin tab on the left panel to see more detailed plugin info.
To favorite a plugin:
Click either the Favorite checkbox or the Star checkbox in the plugin list
This adds the plugin as an
.fstfile into your Plugin Database, inside a subfolder based on its Category field.You can edit the plugin’s Name and Category beforehand or reorganize it later.
Favoriting a plugin automatically creates an .fst preset in your Plugin Database
2. Installed > Effects / Generators > New
Another method is to skip the favoriting checkboxes entirely:
After scanning your plugins, open the Plugin Database > Installed > Effects or Generators folder.
Inside, you’ll see a New folder containing recently added plugins.
From here, just drag Effects onto the Mixer or Generators onto the Channel Rack/Playlist.
IMPORTANT NOTE: This method is fast, but less precise. If you're particular about whether you’re loading the VST, VST3, or CLAP version of a plugin, it’s better to use the Plugin Manager to explicitly favorite the version you want.
You can drag directly from the Installed > Effects/Generators > New folder to use plugins immediately.
🚩 Flag as Favorite
Once your plugins are added, this is where the real customization begins.
For any plugin you’ve loaded into a project, click the top-left dropdown arrow on its window and select Add to plugin database (flag as favorite). This tells FL Studio to create a snapshot of that plugin in its current state, saving it as your new INIT preset. That means any settings you’ve dialed in will be saved and recalled the next time you load the plugin.
In this example, I’m adding the free plugin Voxengo Correlometer to my custom category #Stereo & Pan.
At first, I run into a common error:
“Please first select or open the plugin database subcategory folder(s) that describe this plugin best…”
This happens when no sub-folder is selected in the Browser. In order to flag a plugin into your dropdowns, you must have at least one subcategory folder selected or opened in FL Studio’s Plugin Database.
To fix this, I simply open my target folder #Stereo & Pan. This time, when I flag the plugin, FL Studio adds it directly to the selected folder and confirms the destination.
On the right (in File Explorer), you’ll see that this single action creates all three key files:
.fst— the preset.nfo— the metadata.png— the plugin preview image
Now the plugin exists in my dropdowns exactly where I want it, complete with a visual preview in both the Browser and Plugin Picker.
💡 Pro Tip: Pre-Save Your Favorite Plugin Settings
As mentioned in the previous section, when you flag a plugin as a favorite, FL Studio saves a snapshot of its exact state at that moment. This means you can pre-configure your plugins to always load with your preferred settings, giving you a faster, more consistent workflow.
Here are some common settings you may want to dial in before saving a plugin into your Plugin Database:
🔊 Auto-Gain
Enables automatic compensation of output level when adjusting gain-affecting parameters, especially useful on compressors, saturators, and EQs.
🎧 Auto-Listen
Some EQs offer a band-solo or “auto-listen” mode, letting you hear just the frequency you’re adjusting. Handy for precision cuts.
⚙️ Latency & Phase Modes
Switch between Zero/Low Latency and Linear/Dynamic Phase modes depending on whether you prioritize live responsiveness or minimal phase coloration.
💎 Oversampling / HQ Rendering
Many plugins offer oversampling to reduce aliasing artifacts (unwanted distortion). If the plugin allows, set different modes for live playback vs. offline rendering, keeping CPU usage low while maintaining final output quality.
📉 Compression & Limiting Defaults
You might want to lock in settings like:
Favorite ratio / attack / release times
High-pass sidechain filters
Knee softness or GR metering preferences
You can still adjust thresholds per track, but starting from your “ideal” settings saves time.
🎹 Instrument Library Defaults
For synths and romplers (e.g. Sylenth1, Nexus, Kontakt, Reaktor), you can load your favorite bank or instrument right away, no need to browse every time.
While it’s also helpful to save specific plugin presets for targeted scenarios, this method is best for locking in the knobs, switches, and views you adjust every time. If there’s a plugin setting you always reach for, save yourself the clicks and make it your default.
Advanced Plugin Browser Customization
For those who want to take their Plugin Database a step further, making it not only more functional but also more visually polished, this section covers a few ways to level up your setup. From customizing plugin images to saving multiple variations of the same plugin, these tips can help streamline your workflow and give your database a more refined, professional feel.
Custom Plugin Images
There are several reasons you might want to set up custom .png images for your plugins in the Plugin Picker or Browser:
You prefer a cleaner or branded image instead of a screenshot
You want distinct visuals for multiple versions of the same plugin (e.g., different Patcher presets)
Or the most common — FL Studio glitches and doesn’t generate the image properly
Let’s walk through how to fix broken images or assign custom ones manually.
⚠️ The Problem: Glitched or Missing Image
Occasionally, when flagging plugins into the database, FL Studio may fail to generate the correct .png. Instead of capturing the plugin interface, it might grab the background window or output a pitch-black image. This is often due to GUI quirks, like bridged plugins, window layering, or the plugin being Detached.
Below is an example where I flagged Xfer Serum 2, but the image FL generated just shows the background behind the synth instead of the plugin itself:

🛠 How to Create a Custom Plugin Image
Follow the steps below to fix that broken image or assign your own:

1. Open the Plugin Subfolder
Right-click the folder you want to save the plugin into (e.g. #Synth) and choose Open. This will bring you to the correct location in File Explorer or macOS Finder.

2. Take a Screenshot of the Plugin
Use a tool like Snipping Tool or Greenshot to capture a clean image of the plugin window. Press Print Screen, draw around the plugin, and save the image as a .png.
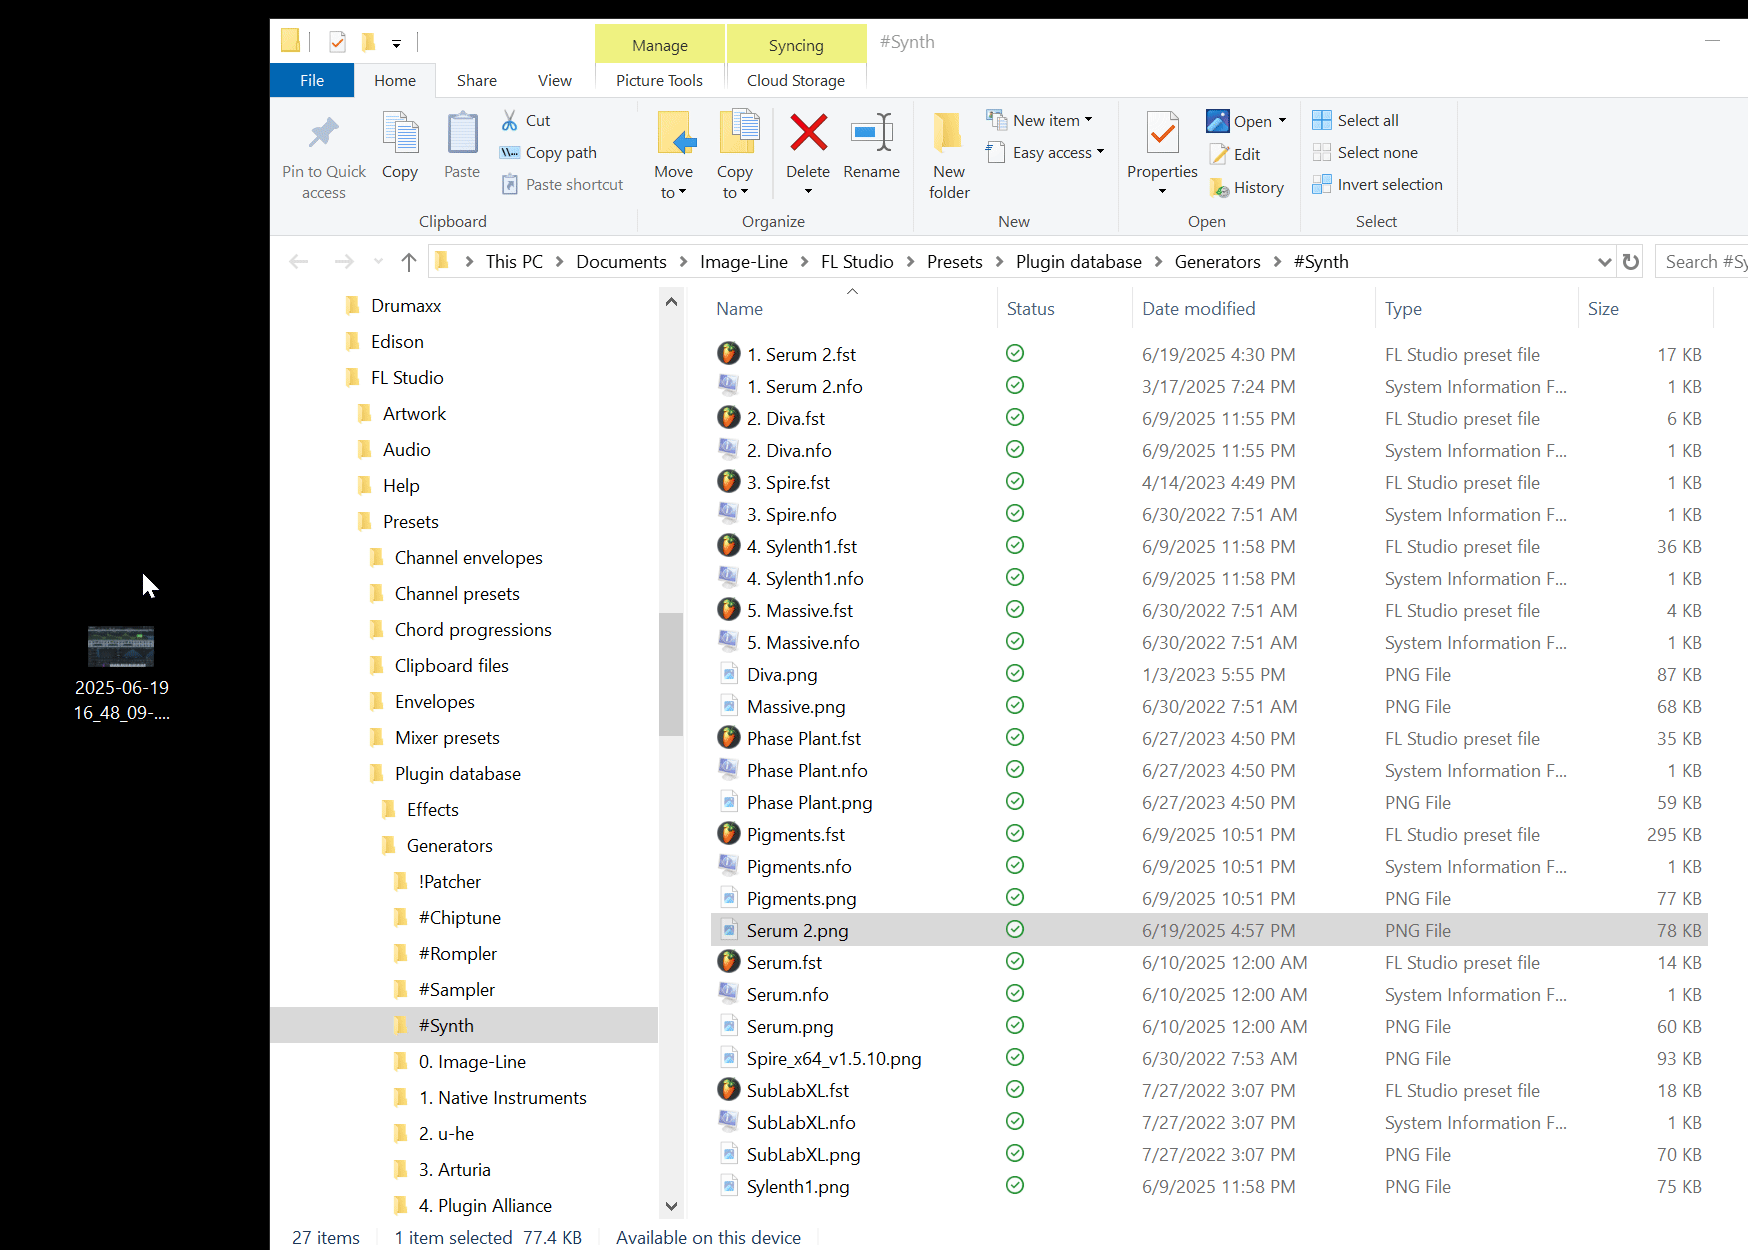
3. Rename & Replace the Image
Rename your screenshot exactly the same as the broken image file (e.g., Serum 2.png), and replace it in the subfolder. FL Studio will now use your image instead of the default one.
NOTE: We Now Have Size Issues
Here’s the trick: plugin preview images should be thumbnail-sized. If your image is full screen or 4K, it will appear oversized in the Plugin Picker.

4. Resize the Image
I use Microsoft PowerToys and its Image Resizer utility (available in the right-click menu). I recommend scaling the image down by ~90% using the Stretch by Percent option. This keeps the proportions intact without forcing specific dimensions.
In my case:
Original: 616 KB
Resized: 16 KB
Result: much better fit in the Plugin Picker
📝 Note: Trial and error may be needed depending on your screen resolution, but ~10% works well for 4K screenshots.
The End Result
We’ve now:
Captured a clean screenshot
Replaced the broken
.pngResized it to thumbnail proportions
Here’s what Serum 2 looks like now in my Plugin Picker; clean, consistent, and fully integrated with the rest of the Plugin Database:
💡 Pro Tip: Same Plugin, Different Presets
Now that we’ve covered how to set up custom plugin images, let’s take things further by combining everything we’ve learned; saving the same plugin multiple times into the same sub-folder, each with its own preset state, name, and image.
There are several great use cases for this approach:
🧩 Patcher instruments and effects
🎹 Native Instruments Kontakt libraries
🎛 Native Instruments Reaktor instruments
🎻 Spitfire LABS sound libraries
If you’re tired of loading a host plugin just to browse for a specific instrument, this is the move. You can create individual plugin dropdown entries that load your preferred state instantly.

Example: NI Reaktor Instruments Broken Out
Normally, I’d have to load Reaktor, then browse to an instrument. Instead, I flagged each instrument variation (Form, Monark, Razor, etc.) as its own .fst preset, renamed the associated .nfo and .png files, created custom images, and placed them inside a Reaktor Instruments folder.
Note: Any plugin with a custom .png image shows the orange flower icon in the Browser.
Step-by-Step: Let’s Add A New One
Let’s walk through the process of setting up a new custom entry for the Reaktor instrument Kontour.

1. Flag Into a Temporary Custom Folder
Since FL Studio treats each instance of “Reaktor 6” the same under the hood, flagging it twice in the same folder will overwrite the previous one.
To avoid this, I do the following:
Create a temporary folder (e.g.,
Custom)Load Reaktor, select Kontour, and flag it into this temporary folder using Add to Plugin Database (flag as favorite)
This gives me a fresh set of .fst, .nfo, and .png files that I can now customize.
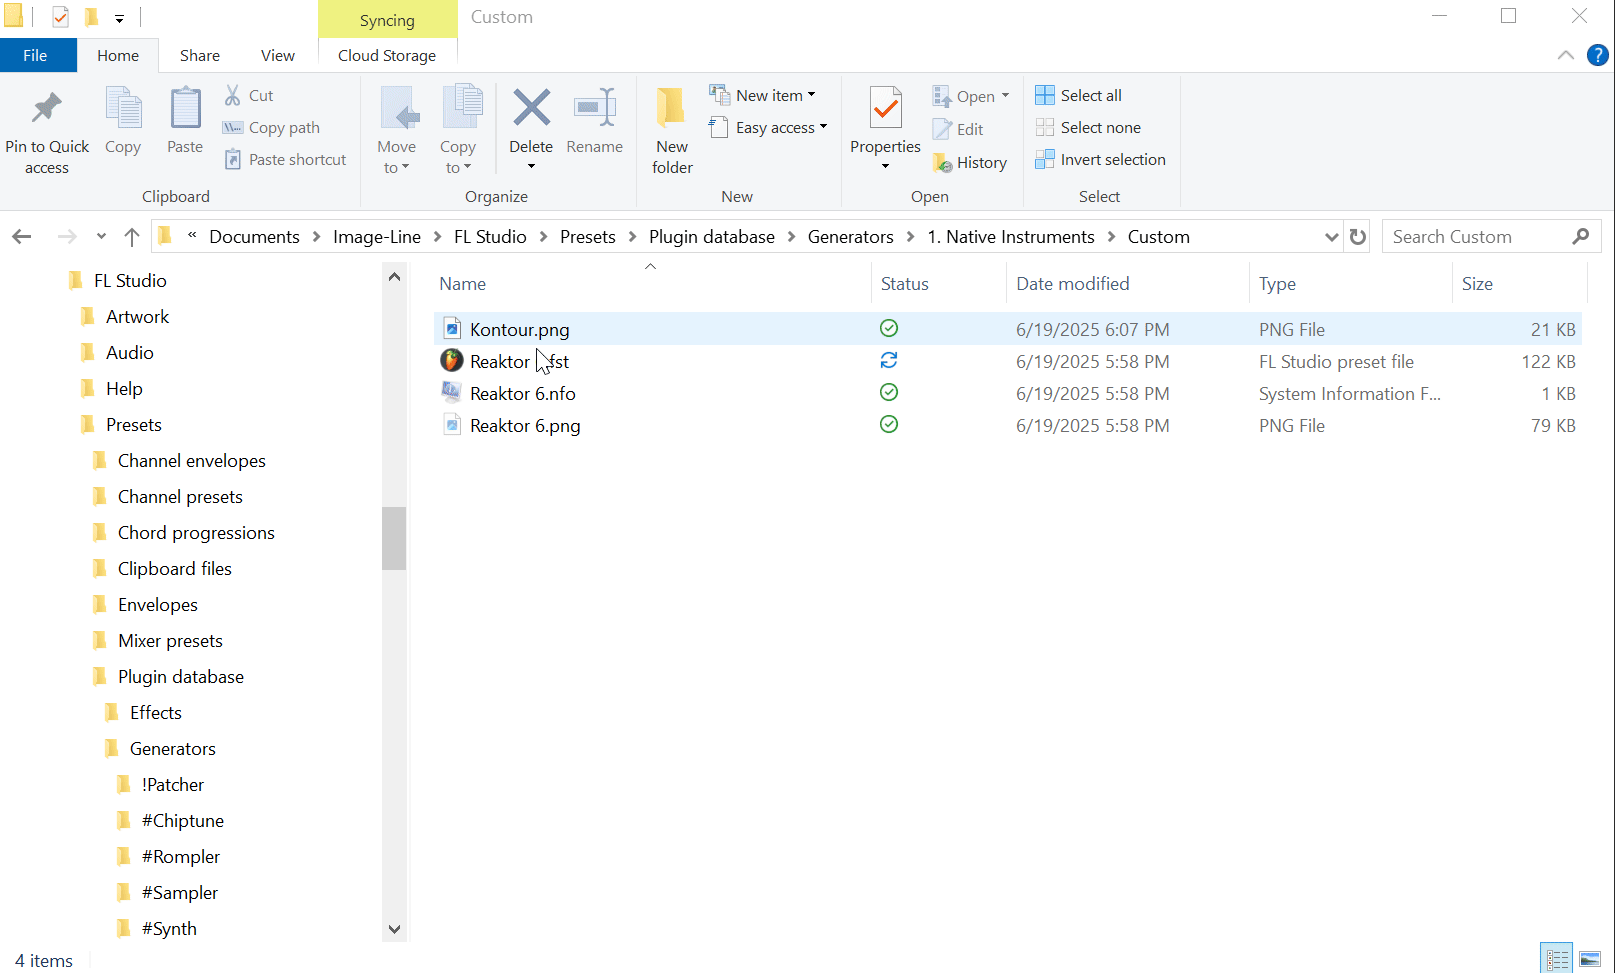
2. Rename the Files & Map to a Custom Image
I first:
Rename the
.fstand.nfofiles toKontourAdd a resized
Kontour.pngcustom image into the same folderDelete the default
Reaktor 6.pngimage
Then:
Right-click the
.nfofile > EditChange the line
Bitmap=Reaktor 6.pngtoBitmap=Kontour.png
This maps the preset to use my new custom image instead of the generic one.
Now that everything is customized, I simply move the Kontour.fst, Kontour.nfo, and Kontour.png files into my Reaktor Instruments folder.
Done! I now have a dedicated entry for Kontour, with a matching image and immediate load behavior.
By repeating this process, you can build custom shortcuts for variations of the same plugin; giving you fast access to your favorite Patcher templates, Kontakt Instruments, Reaktor ensembles and more.
Categorizing Your Plugins: Organization Strategies
Now that we’ve covered the essentials of the Plugin Database including file types, how to flag favorite presets, and customizing plugin images, it’s time to take a step back and look at broader organization strategies.
In my earlier blog on organizing your sample library, I introduced the idea of chunking, grouping sounds by genre, use case, or type to simplify browsing. The same approach works perfectly for plugins. If you haven’t read that blog yet, one of the key strategies I discuss is the use of special characters (!, #, _, $, etc.) and numbers to control how folders are sorted in the FL Studio Browser.
As your plugin collection grows, simple A–Z alphabetical sorting often becomes inefficient. By naming your sub-folders with sorting characters or numerical prefixes, you can prioritize your most-used categories and keep them at the top of the list, making it faster to find what you need and stay in the creative flow.
Example of categorized Effects folder using `!`, `#`, and numbered prefixes to sort plugins by function or developer.
🎹 Strategies for Generators (Instruments)
One of the easiest and most effective ways to organize your virtual instruments is by grouping them into logical categories. Below are two common approaches, each with examples that help you quickly find what you need based on how you work.
By Instrument Type / Favorites:
Synths – Serum, Phase Plant, Diva, Spire, Pigments, Massive
Instrument Libraries – Kontakt, Spitfire LABS, Orchestral Tools SINE
Samplers – DirectWave, Waves CR8, PotenzaDSP Amigo
Romplers – Omnisphere, Nexus, VPS Avenger
Drum Machines – FPC, Battery, XO, PunchBox
By Developer / Company:
Image-Line
Arturia
Native Instruments
u-he
Plugin Alliance
These categorization methods help you browse with intent, whether you’re reaching for a specific synthesis engine, a trusted brand, or just your go-to instruments. This approach also scales well as your collection grows, especially when combined with sorting characters like ! or # to group your favorites near the top.
🎚 Strategies for Effects (FX)
The same chunking approach applies to your FX plugins. Instead of scrolling through one massive list, organizing your effects into purpose-driven folders makes finding the right tool faster and more intuitive.
By Use Case / Favorites:
EQs & Filters
Compressors
Reverbs & Delays
Distortion & Clippers
Stereo Imaging & Panning
Analyzers & Meters
Mastering Tools
By Developer / Company:
FabFilter
Waves
SoundToys
Universal Audio
iZotope
Cableguys
These organization methods become especially useful as your collection grows. Having your go-to tools and full plugin bundles sorted into folders keeps your workflow efficient, no more endless scrolling through an alphabetical list.
Combining Systems to Match Your Workflow
For both Generators and Effects, your folder structure should reflect how you think and work. You can organize entirely by function, entirely by brand, or mix the two. Here's how I personally approach it:
Use
!to push my most-used tools to the topUse
#to group folders by use case (EQ, Reverb, etc.)Use numbers to sort companies by how often I reach for them (e.g.
1 FabFilter,2 iZotope, etc.)
And since Analysis and Mastering tools are typically used in the final stages of a project, I intentionally leave those folders toward the bottom of my dropdowns.
There’s no right or wrong way. Whatever associations work for your brain, lean into those. Design your sub-folder structure to serve you, so browsing becomes second nature and creation stays in flow.
FAQs & Troubleshooting
-
This usually happens because you have multiple versions installed (e.g., VST2 and VST3, or both 64-bit and 32-bit). You can manage this by:
Favoriting only the version you want to use
Renaming .fst files for clarity (e.g., Serum 2-VST2 vs. Serum 2-VST3)
-
You don’t need to uninstall plugins from your system to declutter your Plugin Picker. Instead, you can safely delete the .fst, .nfo, and .png files from your Effects and Generators folders in the Plugin Database. This will remove them from your active dropdowns while still keeping the plugin available under the Installed folder if needed for legacy projects.
🔔 NOTE: If you delete anything from the Installed folder itself, you may need to rescan with the Plugin Manager to bring those plugins back.
-
Yes. If you upgrade from one FL Studio version to another (e.g. FL Studio 24 → FL Studio 25), all of your Plugin Database organization can carry over, as long as you're using the same User Data Folder.
Just do the following:
In your current version of FL Studio, go to File Settings and copy the User Data Folder path.
After installing the new version, paste that same path into the new FL Studio’s User Data Folder field.
All of your plugin organization (folders, images, presets) will then be carried over seamlessly.
-
Yes. Here’s how to do it:
On your old machine, press Shift + F8 to open the Plugin Database in FL.
Right-click the Plugin Database in the Browser and choose Open to access it in File Explorer or Finder.
Copy the contents of your Effects and Generators folders.
On your new machine, open the new FL Studio installation, go to the Plugin Database the same way, and paste the copied folders into the same Effects and Generators folders respectively.
🔔 NOTE: You’ll still need to reinstall all of your plugins on the new machine in order for .fst preset files to load properly. To stay organized, I recommend tracking your plugin purchases and installs.
I created a Music Plugin Library Manager Google Sheet to help you document everything — what you own, how it installs, and whether it uses license files, iLok, serials, etc..
-
If the plugin keeps the same internal identifier (most do), your .fst will still load correctly even after a plugin update or reinstall. However, if a plugin is reinstalled to a different format (e.g., VST2 → VST3), the .fst may no longer point to the same plugin version. In that case, re-flagging may be necessary.
Conclusion
Taking control of your FL Studio Plugin Database can feel like a big task at first, especially if your collection has grown out of hand over time. But once you go through the initial process of organizing, flagging, and customizing, the benefits start to show up right away and they only grow over time.
From cleaning up cluttered dropdowns to creating faster shortcuts to your favorite snapshots of your favorite plugins, everything we’ve covered in this guide comes down to one goal: saving time and staying in your creative flow.
The more intentional you are with your organization, the less time you’ll spend scrolling, searching, or toggling the same settings over and over. And once you’ve done the heavy lifting, it’s surprisingly easy to keep things tidy, flagging new plugins as you add them, organizing them into folders, maybe even dropping in your own custom image. It quickly becomes second nature.
How do you like to organize your plugins? Do you sort by function, developer, or something else entirely? Have you found any folder naming tricks or visual cues that help you stay focused?
I’d love to hear how other producers approach their plugin organization, whether it’s clean and minimal or totally customized. Let me know your strategy, or feel free to share any tips you’ve picked up along the way.
Because at the end of the day, it’s not just about having a neat library, it’s about building a workflow that works for you and helps you make more music, with less friction.
As always, thank you for your time.
LETT