
FL Studio Plugin Management (Part 1): Understanding, Installing, and Scanning Plugins

Table of Contents
Introduction
If you’re new to music production or just getting started with FL Studio, plugins can feel overwhelming. Between different file formats, installation paths, activation methods, and how to actually make them show up in your DAW, it’s easy to get lost. Even experienced producers struggle with keeping their growing plugin libraries organized over time.
That’s why I’ve written this two-part blog series to help demystify the entire plugin process. Part 1 (this post) will guide you through the essentials: what plugins are, the different file types and formats you’ll encounter, how plugin installation works, and how to scan everything into FL Studio using its Plugin Manager. I’ll also walk you through each option in the Plugin Manager so you understand exactly what’s happening behind the scenes.
If you already know the basics and just want to focus on organizing a large plugin library, feel free to skip ahead to the 💡 “Pro Tip” sections, then jump directly to Part 2, which covers plugin library management, custom folders, favorites, visual organization, and more. That said, even advanced users may benefit from a full review of the Plugin Manager section, as it includes a detailed breakdown of every setting and some performance tips you might not be using yet.
Let’s get plugged in.
What Is a Plugin?
In music production, a plugin is a piece of software that adds functionality to your DAW (Digital Audio Workstation), such as FL Studio. Plugins come in many forms, from virtual instruments like synthesizers and samplers to audio effects like EQs, reverbs, compressors, and delays. Think of them as modular tools that help generate, or shape and process your sound.
Generators vs. Effects in FL Studio
In FL Studio, plugins are categorized into two core types:
Generators – These create sound. Generators include instruments like synthesizers and samplers, and they are loaded into the Channel Rack as an instrument or the Playlist directly as an Instrument Track.
Stock examples: 3xOsc, FLEX, Sytrus, Slicex
Popular paid examples: Serum (Xfer), Kontakt (Native Instruments), Diva (u-he), Pigments (Arturia)
Effects – These process sound. Effects are loaded into Mixer tracks and used to modify existing audio with tools like EQ, compression, reverb, and delay.
Stock examples: Fruity Parametric EQ 2, Fruity Limiter, Soundgoodizer, Gross Beat
Popular paid examples: Pro Q 3 (FabFilter), Ozone (iZotope), Antares Auto-Tune (Antares), ShaperBox 3 (Cableguys)
Plugin File Types Explained
Plugins come in several formats, each with its own structure and compatibility:
VST1 & VST2 (
.dll) – An older but still widely supported format for both instruments and effects. Many legacy plugins are VST2 only.VST3 (
.vst3) – The modern VST standard. Offers better performance with features like dynamic I/O, improved CPU efficiency (only uses CPU when active), and enhanced MIDI handling. If both VST2 and VST3 versions are available, use VST3 unless you encounter stability issues.CLAP (
.clap) – A newer open-source format designed to be lightweight, efficient, and developer-friendly.AU (
.component) – Short for Audio Units, this format is exclusive to macOS and used in Logic Pro and other Apple-native DAWs. Not supported in FL Studio for Windows users.AAX (
.aaxplugin) – Avid’s proprietary format, used exclusively in Pro Tools. Not supported in FL Studio.
FL Studio supports VST2, VST3, and CLAP, with native support improving for CLAP in recent updates. AAX is not compatible with FL Studio.
Plugin Installation
Common Install Methods
The installation process for plugins varies by developer, but most follow one of a few standard formats. Whenever you buy or download plugins, always look for a reference document or installation instructions file for that specific plugin to follow along with.
Below are the most common methods you'll encounter:
Direct Plugin Files

Sometimes a plugin is provided as a raw file—such as a .dll, .vst3, .clap, or .aaxplugin—without an installer. This is less common today, but when it happens, you’ll need to manually place the file into the appropriate plugin directory on your system (see the Installation Paths section below for help).
Always read any included installation instructions carefully to make sure the plugin is placed in the correct location for your DAW to find it.
Installer Files (.exe or .dmg)
This is the most common method. These installers typically prompt you to:
Choose which formats to install (e.g., VST2, VST3, AU, AAX, CLAP)
Choose installation paths for each format
Unless you have a specific need for a custom path, it’s usually best to leave these set to their defaults for consistency and ease of future updates.
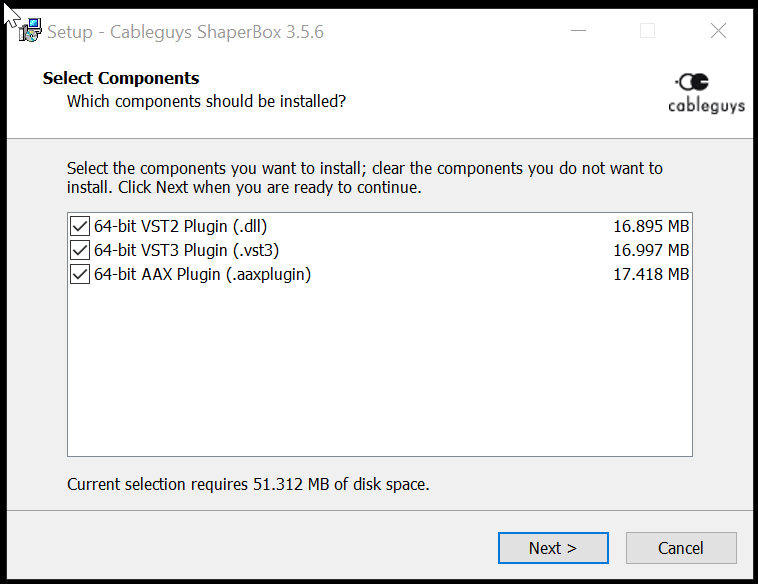
Company Installers (Centralized Installation Manager for a Company/Developer)

Many plugin companies offer their own standalone applications to manage downloading, installing, updating, and activating their plugins. These apps often allow batch installation and give you access to multiple products from the same developer.
Example Installer Apps: Arturia Service Center (pictured), Native Instruments Native Access, iZotope Product Portal, Waves Central, Plugin Alliance Installation Manager, UA Connect, Softube Central, Acustica Aquarius, IK Product Manager, Steinberg Download Assistant, etc.
NOTE: You’ll often find install path options in a “Settings” or “Preferences” page within these apps.
Installation Paths
No matter which install method you use, plugins must be placed in specific folders for your DAW (like FL Studio) to find them. Most installers will either default to these common paths or ask you where you'd like to install each format. If you're unsure, it's best to stick with the default paths to avoid complications during scanning or updates.
If you decide to use custom locations, be sure to remember them, as you'll need to manually add those paths to FL Studio’s Plugin Manager later.
Windows Default Paths
VST 1 and 2 Plugins (.dll):
'C:\Program Files (x86)\VSTPlugins' OR 'C:\Program Files\Steinberg\VSTPlugins' (32 Bit plugins)
C:\Program Files\Common Files\VST2 (64 Bit plugins on a 64 Bit Windows only)
'C:\Program Files\VSTPlugins\' OR 'C:\Program Files\Steinberg\VSTPlugins' (Extra search 64 Bit plugins).
VST 3 Plugins (.vst3): - NOTE: VST3 plugins must be installed to the exact locations shown below, otherwise they will not be found during a scan.
C:\Program Files\Common Files\VST3 (32 Bit plugins on 32 Bit Windows).
'C:\Program Files (x86)\Common Files\VST3' OR 'C:\Program Files (x86)\VST3' (32 Bit plugins on Win 64 Bit Windows).
C:\Program Files\VST3 (64 Bit plugins on 64 Bit Windows)
CLAP:
C:\Program Files\Common Files\CLAP
NOTE: Many companies use folders like Steinberg\VSTPlugins\ due to Steinberg being the original creator of the VST format.
macOS Default Paths
VST 2 plugins (.vst):
[Macintosh HD]/Library/Audio/Plug-Ins/VST
[Macintosh HD]/Users/Username/Library/Audio/Plug-Ins/VST (rarely used)
NOTE: The /User/Library is hidden by default.
VST 3 Plugins (.vst3):
[Macintosh HD]/Library/Audio/Plug-ins/VST and Library/Audio/Plug-ins/VST3
[Macintosh HD]/Users/Username/Library/Audio/Plug-Ins/VST3 (rarely used)
NOTE: The /User/Library is hidden by default.
Audio Unit Plugins (.au):
[Macintosh HD]/Library/Audio/Plug-Ins/Components/
CLAP:
[Macintosh HD]//Library/Audio/Plug-Ins/CLAP
Regardless of your platform, keeping track of your plugin install locations is crucial. You'll need these paths when scanning plugins into FL Studio. All paths, default or custom must be added into FL Studio’s Plugin search paths, covered in the Plugin Manager section later.
Activation & Registration
After installing a plugin, you may still need to activate or register it before it’s fully usable. This process varies by developer, and activation often happens the first time you load the plugin inside your DAW. Below are the most common activation methods you’ll encounter:
User Account Login / Email Activation
Some plugins only require you to log in using the same email and password you used when purchasing or registering. This is one of the simplest methods.
✅ Tip: Keep track of your login credentials, though most companies offer password recovery via email if needed.
Serial Numbers / Registration Codes
These are codes that you need to copy and paste into a plugin window popup in order to show proof of purchase and active onto your machine. They generally look like the following:
ABCD-EFGH-IJKL-1234-5678
A-BCDE-123456-ABC-DEF
-- COPY LICENSE KEY FROM HERE --Product: Pro-Q 3, Pro-R, Pro-C 2;Licensee: "JOHN DOE";abcdefghijklmnopqrstuvwxyx1234567890-- COPY UNTIL AND INCLUDING THIS --
Example companies: FabFilter, u-he, oekesound, Xfer, Wavesfactory
License Files

Some plugins come with a downloadable license file (usually .lic, .txt, or even .png) that must be:
Dragged into the plugin window, or
Selected through a file browser when prompted
Example companies: Cableguys, Plogue, Reveal Sound, Valhalla DSP, VPS
iLok Licenses

Some developers use iLok for copy protection. You’ll need to install iLok License Manager (pictured), where licenses can be:
Activated to a physical USB dongle
Stored on your local machine
Stored in the cloud (iLok Cloud)
This is common for plugins that require more advanced DRM (Digital Rights Management).
Example companies: Soundtoys, oeksound, Softube, UA (Universal Audio), Zynaptiq
💡 Pro Tip: Keeping Track of What You Own
If this installation section feels long and overwhelming, that’s because plugin management can get messy, especially as your collection grows. With dozens (or hundreds) of plugins from different companies, each using different installers, activation methods, and file paths, things can quickly spiral out of control. That’s why I recommend keeping a centralized, up-to-date record of everything you own.
This is why I created a Google Sheet template to keep track of every plugin you own, their associated websites, download methods, serial codes, license files, those with iLok, and more. Visit the link below to explore this free resource.
Music Plugin Library Manager
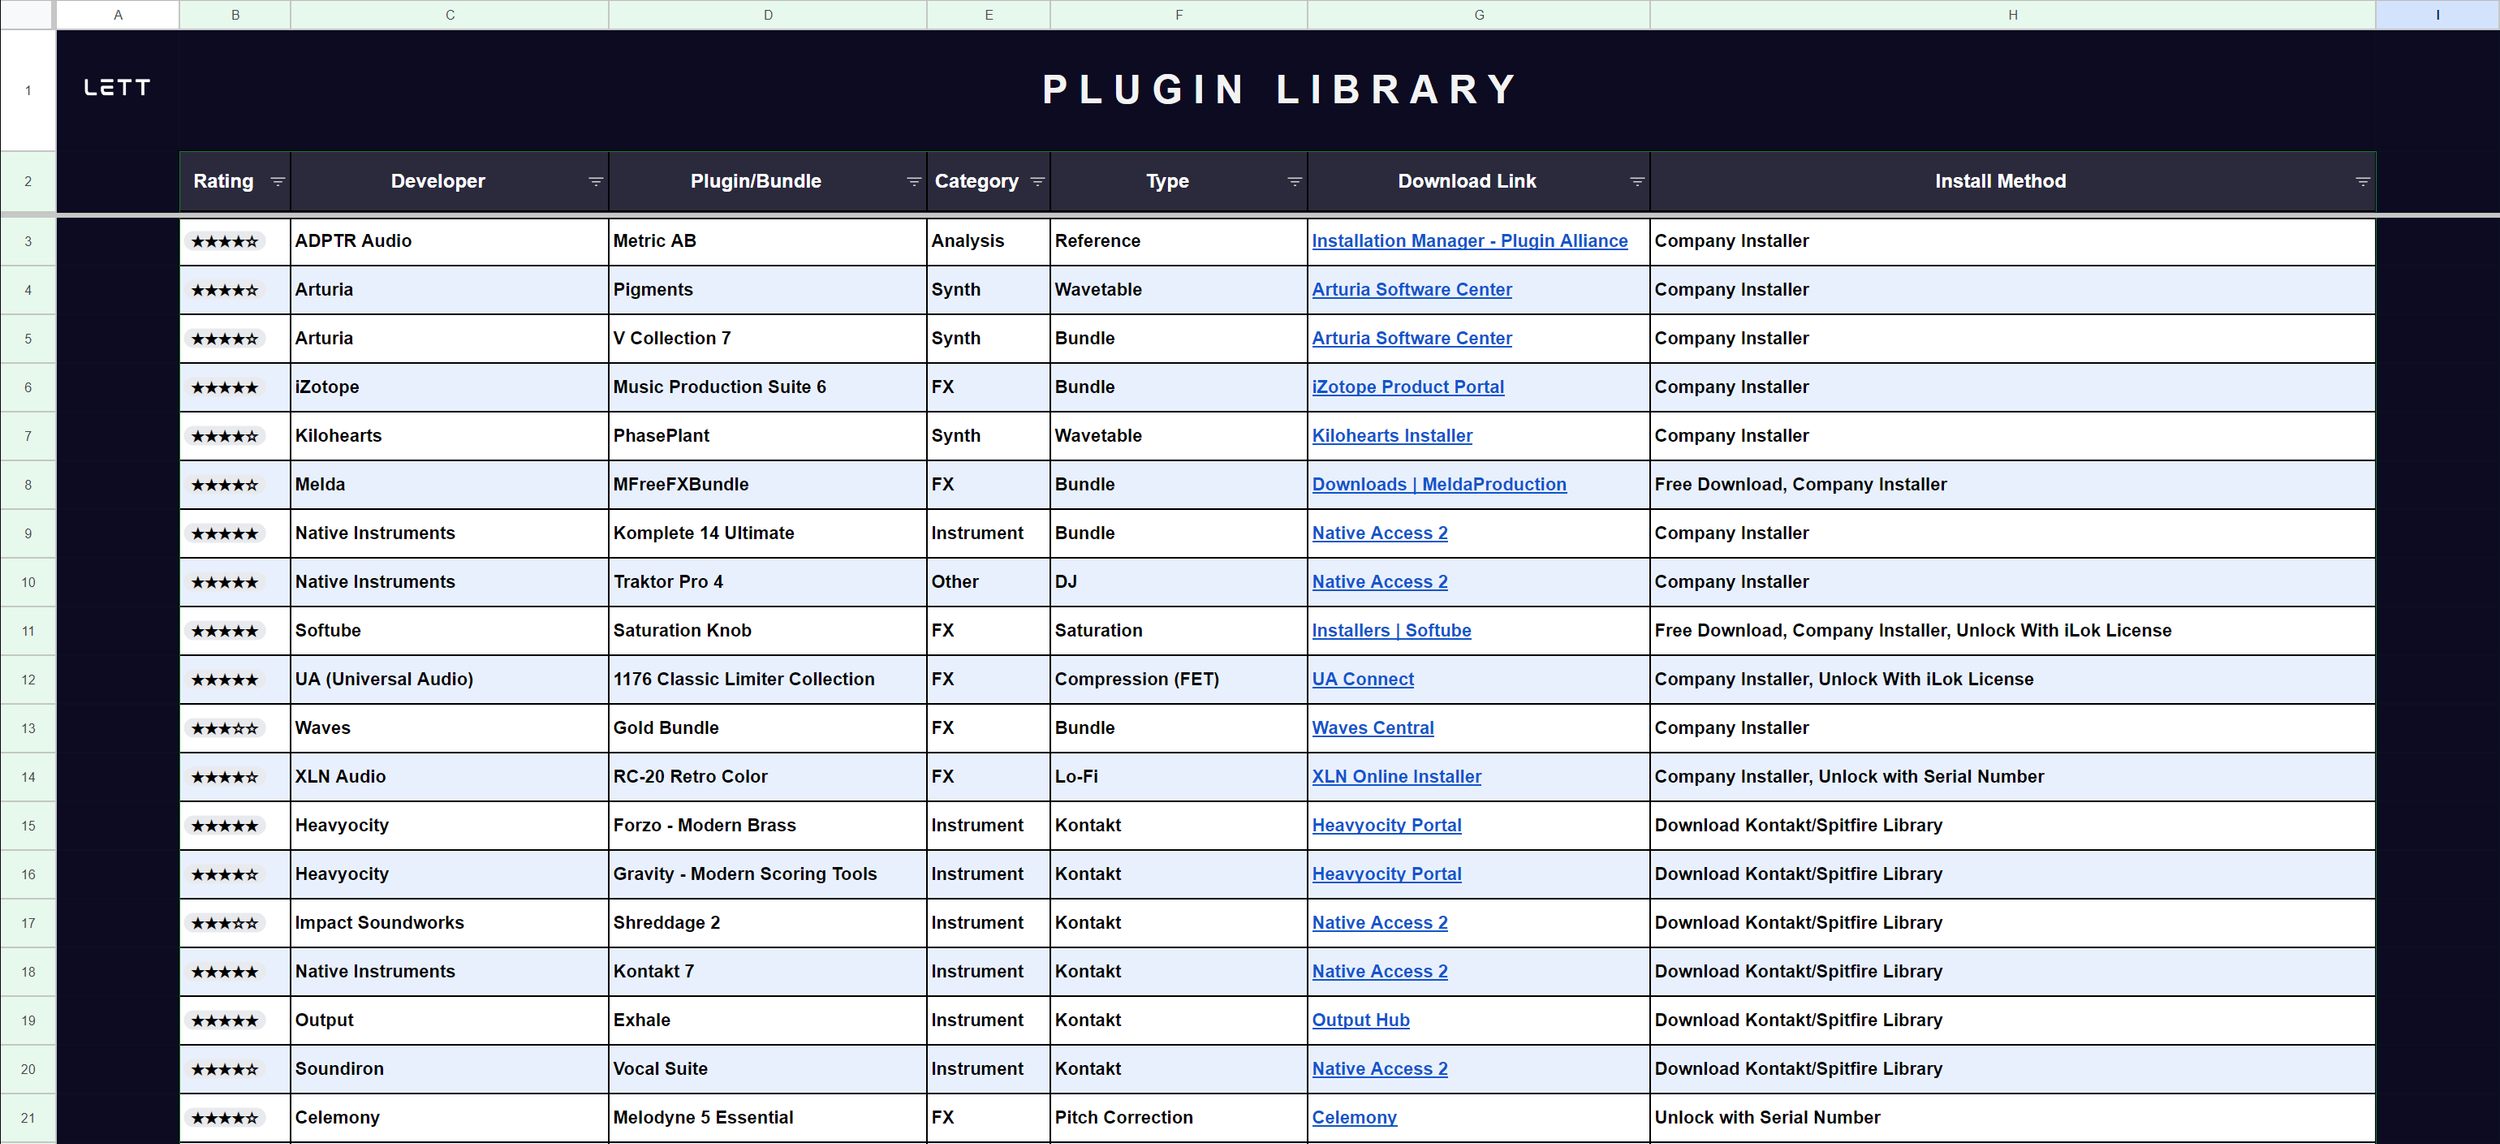
The Ultimate Plugin Organization Spreadsheet 📂
Are you a music producer tired of losing track of plugins, serials, and licenses? The Music Plugin Library Manager is a meticulously designed Google Sheets template that helps you organize, track, and future-proof your entire VST, AAX, CLAP, and Kontakt plugin collection. Whether you’re preparing for system migrations, disaster recovery, or just keeping your setup organized, this template has you covered.
🔍 Key Features:
✅ Comprehensive Plugin Categorization – Organize plugins by installation type, serial registration, license files, and more for quick access.
✅ Automated Aggregation – See all your plugins in one sheet, enabling fast updates and efficient management.
✅ Future-Proof Your Collection – Be ready for hardware upgrades, OS migrations, or reinstallations without losing track of essential plugins.
✅ Cloud Backup Integration – Store license files directly in Google Drive, ensuring instant access from anywhere.
✅ FREE Plugin Database Included – A curated list of top free plugins from over a decade of music production experience.
Perfect for producers of all levels, this easy-to-navigate, centralized solution streamlines your plugin workflow while safeguarding your creative tools.
📥 Download & Get Organized Today!
Whether or not you use my template, some form of documentation is essential, especially if you ever:
Migrate to a new machine
Reinstall your OS
Lose access due to hardware failure, theft, or damage
A cloud-based solution (like Google Sheets) ensures your records aren’t tied to one device. Keep it updated as you buy new plugins and your future self will thank you. Trust me, you will not want to have to guess what you own or dig through old purchase confirmation emails to hunt for serial numbers every single time.
FL Studio's Plugin Manager
Once your plugins are installed, the next step is getting them recognized in FL Studio. This is done through Plugin Manager, a built-in tool that scans your system for plugin files and adds them to your plugin database.
How to Open Plugin Manager

There are several ways to access Plugin Manager in FL Studio. Here are the most common (listed from fastest to most roundabout):
Top Toolbar →
OPTIONS→Manage pluginsTop Toolbar →
OPTIONS→File Settings→ clickManage pluginsTop Toolbar →
ADD→More Plugins...→ clickManage pluginsat bottom rightChannel Rack / Playlist → click
+button →More plugins...→ thenManage pluginsMixer Insert Slot → click empty slot →
More plugins...→ thenManage plugins
Once we have the Plugin Manager open, we are ready to start scanning in plugins. I will go through the interface of the Plugin Manager, the various pages, and all applicable settings.
Options Page: Search Paths and Scan Options

The main landing page is the Options page and where you will be most of the time in Plugin Manager. Here’s what each setting and button does:
1. Find installed plugins - Click this button to initiate a scan across all search paths to locate plugins.
2. Verify plugins ✅ - Helps FL Studio categorize each plugin correctly as either a Generator or Effect. It also ensures only valid plugins appear in your plugin menus.
Leave this enabled for most scans unless you're troubleshooting scan speed.
3. FL Studio folder 📁 - This shows where FL Studio’s built-in (stock) plugins are stored.
You typically don’t need to change this.
4. Plugin Search Paths 🔍
These are the folders FL Studio scans when looking for plugin files.
Click the folder+ icon to add custom paths (for example, if you installed plugins outside of default locations).
Make sure all your VST2/VST3/CLAP paths are included here.
REMINDER: VST3 plugins must be installed in default locations (see default paths section) or they won’t be found.
5. Scan Options ⚙️
Rescan previously verified plugins - This option ensures plugins are correctly scanned after updates.
Rescan plugins with errors - Rescan plugins where the plugin errored out or the status is not ‘ok’
Try to prevent popup windows - Tries to suppress activation screens or other pop-ups during scans.
Combine VST and VST3 versions of a plugin - Combines VST1/2 and VST 3 versions into one combined plugin.
Combine 32 and 64 bit versions of a plugin - Merges 32-bit and 64-bit versions into a single listing.
6. Always on top 📌- Checkbox to treat the Plugin Manager window like a detached window that’s always above other windows.
7. Find 🔎 - Search scanned plugins by name or keyword.
Plugin Page

The Plugin tab gives you detailed info about any selected plugin in your list. Here’s what you’ll see:
Info ℹ️
Name - Name of the plugin
Status - status of plugin after scanning, will show ok if in a good condition, could be blank if not verified.
Type - Synth or Effect are the only two options (corresponds to Generator or Effect).
If you scan with ‘Verify plugins’ checked, FL Studio will attempt to determine this for you automatically. This field can only be edited if you scan in plugins without verification and need to manually select.
Vendor - The company or plugin developer associated with the plugin; i.e. Image-Line stock, Waves, FabFilter, Arturia, etc.
Preset filename - The location and path where your .fst preset is created in your Plugin Database.
NOTE: This is not to be confused with where your .dll/.vst3 files are installed. When you scan and add plugins in FL Studio, this will create .fst preset files into your Generators and Effects folders.
Favorite ⭐
When checked, this adds the plugin to your Plugin Database and makes it available in your plugin lists (with a ☆ star icon).
Tip: After you scan in plugins, newly discovered ones will appear yellow. Check to favorite these plugins into your Plugin Database, adding .fst presets into your Generator or Effects folder based on Type.

Category 📁- This determines the folder your plugin preset appears in (within the Plugin Picker or plugin menus). You can rename categories for organization.
Combined Plugins 🧬
If FL Studio detected multiple versions of the same plugin (e.g., VST2 & VST3), they’ll be grouped under a single entry. For each version, you’ll see:
Format - VST2, VST3, CLAP, etc.
Bits - 32-bit or 64-bit
Filename - The actual file name and full installation path

Notice how everything on the Plugin page corresponds with the columns of your scanned plugin library. This section is mostly helpful when troubleshooting or manually cleaning up duplicate versions.
💡 Pro Tip: Speed Up The Scan Process
If you’ve used FL Studio for quite some time, you may notice that over time as you acquire and install more plugins, it feels more and more sluggish to run a full scan every single time just to scan in one new VST. There is a trick that you can do to speed this process up significantly not only for the immediate scan, but to keep your scans clean and quick going forward as well. Try this trick to see if it helps to shave off many seconds or even minutes off of your plugin scan time.
Open Plugin Manager
Uncheck the “Verify plugins” checkbox then click “Find installed plugins”. This will run a faster scan that skips the verification process.
After the scan, look at the top of the plugin list for any entries marked with a ? icon. These are unverified or invalid plugin, often remnants from uninstalls, broken installations, or outdated formats.
Select each unknown plugin and check its Filename (under the Plugin tab) to locate the physical file. Then:
Open that folder in File Explorer/Finder
Delete the file if it’s outdated, broken, or no longer needed

When you run a full scan with ‘Verify plugins’ checked, these unknown results may cause a lot of extra lag time where the Plugin Manager is trying to verify something that it cannot. Deleting and clearing out any ? results will cause full scans with ‘Verify plugins’ checked to go much faster.
I have over 1000+ plugin results in my Plugin Manager and my full scan completes in under 5 seconds after clearing out the unverified ? results.
I recommended to leave “Verify plugins” checked when scanning plugins, but if your scans start to take a really long time, try this tip to see if you have any hidden unknown ? results pop up that is bogging down your scan time.
FAQs & Troubleshooting
How do I know what the format or version is of a plugin that I am actively using?

Check the settings tab under the plugin options.
Click the cog wheel on the top of the window to reveal more detailed plugin settings.
Click the Plugin Options tab.
On the Settings page, you will see Info about your plugin, including the Type, whether its VST2 or VST3, or 32-bit or 64-bit for example.
-
Make sure the plugin file was installed to a folder listed in FL Studio’s Plugin Search Paths, and that the format is supported (VST2, VST3, or CLAP). Then open Plugin Manager and click “Find installed plugins” to rescan.
-
Usually no. If VST3 is available and stable, it's the recommended format due to better CPU handling and modern features. Installing both is optional, but can clutter your plugin list.
-
FL Studio runs best with 64-bit plugins on a 64-bit system. 32-bit plugins are mostly outdated and may cause performance or compatibility issues.
32-bit plugins can only access up to 4GB of RAM. 32-bit plugins can run on a 64-bit system, but 64-bit plugins cannot run on a 32-bit system.
-
Combining versions can help reduce clutter in your plugin list, but it’s not always the best choice. In my experience, some plugins, like those from Waves, only worked correctly when VST2 and VST3 were scanned separately. Combining them caused loading issues that disappeared once I unchecked the setting.
Keeping versions separate can also help you test each one for stability, UI scaling bugs, or crashes. If you notice problems (like glitches or poor performance) in one version, you can switch to the other without affecting your entire setup.
Tip: If in doubt, scan them separately first to test both formats—then combine only if both work reliably.
-
This usually happens when the plugin type used in the project file doesn’t match what’s scanned in your FL Studio setup. Even if you both own the same plugin, one of you may have used the VST2 version while the other has only the VST3 (or vice versa). If you’ve combined plugin versions in Plugin Manager, FL Studio may not recognize the specific format used in the original project.
To fix this, try rescanning your plugins with "Combine VST and VST3 versions" unchecked, so both versions appear separately. This allows FL Studio to find and match the exact plugin format used in your collaborator’s .flp.
-
First, try unchecking “Verify plugins” in Plugin Manager and run a new scan. This can bypass some stability checks that may be causing issues. If the plugin still shows a “?” icon or causes FL Studio to hang, it may be outdated or incompatible.
Also try enabling “Try to prevent popup windows.” Some plugins attempt online activation or registration checks during scanning, which can cause FL Studio to freeze if the window is blocked or unresponsive.
-
It's not recommended. If you need to move them, make sure to update your Plugin Search Paths and rescan. Some plugins may break if their dependencies or registry entries aren't also moved.
-
While this might work for a few simple plugins (like standalone .dll files), it’s generally not recommended. Many plugins, especially VST3 formats, must be installed in specific default paths or they won’t be recognized by FL Studio. Simply copying files may cause them to fail during scanning.
Additionally, many plugins install supporting content like GUIs, preset banks, wavetables, samples, or noise profiles in other system folders such as:
Documents
ProgramData
Common Files
%AppData% (on Windows)
If these components are missing, the plugin may crash or load incorrectly.
✅ Best practice: Reinstall your plugins from their official installers on the new machine to ensure all components are placed correctly. It’s the most reliable way to avoid issues during setup.
Conclusion
Getting started with plugins doesn’t have to be overwhelming. Once you understand the different file types, installation methods, and how to scan them into FL Studio, you’ve already overcome one of the biggest technical hurdles in music production.
In this first part, we covered:
What plugins are and how they work in FL Studio
The difference between Generators and Effects
Common plugin formats (VST2, VST3, CLAP, etc.)
How to install and activate plugins
How to use FL Studio’s Plugin Manager to scan and troubleshoot them
In Part 2, we’ll go beyond installation and explore how to organize your plugin library, create custom category folders, assign favorite plugins, and even add custom images to your Plugin Picker. Whether you're building your first collection or managing hundreds of tools, Part 2 will help you stay efficient and inspired.
👉 Continue to Part 2
As always, thank you.
LETT